

* This is just a review of my own about a program I love and found very useful. No one asked to be create this review, its all me 🙂
Now that we have all stocked up on great new materials, I wanted to share one of my favorite programs that I use with my students. When my students work on describing, using the fun activities I get from TpT, they use a system that has helped them leaps and bounds. Today I want to share the Expanding Expressions Tool ( EET ) with you. I saw this tool advertised is a speech magazine, either Advanve or the ASHA Leader ( I can’t remember which ) and my interest was peeked. I was struggling to find a way to make describing easier for my students to understand. I had used other books and programs that would help a bit but not enough for my students to fully grasp the strategies. They seemed to be missing some connecting piece for their ideas, what information to include, and how they are supposed to get their point across. I needed something concrete for them to use to understand. I had created my own acronym for them, but the EET took everything a step farther. I did a bit more research and was hooked. This tool had everything I needed: a concrete system, manipulatives, practice sheets, etc. So I decided to take the plunge!
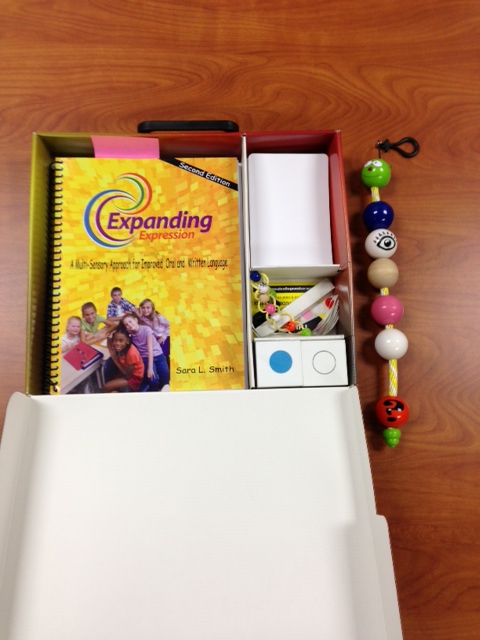
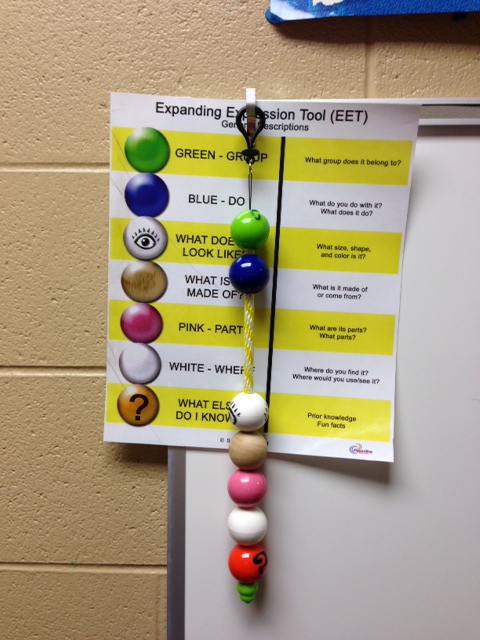
The EET is a multisensory approach to improving oral ( expressive ) and written language. Yes, it targets writing too! You get a bead strand that kind of looks like a caterpillar. Each bead is a different color. The color corresponds to a component of information that may be needed to talk about something: category, function, appearance, what is it made from, parts, location, and there is a bead for including prior knowledge. I let me students use this as a way to share a ‘fun fact’ about the subject. You also get a visual aide poster, cards with real object pictures to use for practice, dice with the EET colors to use for games, guidance stickers that can be placed on sutdent’s papers to help with writing, and an awesome manual with lots of practice pages for each section and instructions for you. When stuents are starting out they take each bead and given information about an object depending on what bead they are on. When they are done providing that piece of information they slide the bead up and move to the next one.
I made some individual posters for each component since some of my students have vision issues and it made going over the colors/beads a bit easier for a group. Some of my students have severe learning disabilties. I was mostly interested to see how they would respond to it. The first time I used it I wanted to see a before and after. I have them write down a description of an apple. I happend to have an apple in my lunch so I placed that in the middle of the table for inspiration 🙂 The descriptions they had were very basic: ” It’s red and you can eat it.” or ” It red and a fruit.” These descriptions were fine, but very basic. Definitly not what would be expected for students their age. I asked them, ” What else can you say?”. That’s when one of my students said the perfect lead in for the EET, ” I don’t know what else to say.” After going through the EET process there were able to give me full paragraph descriptions. Things seemed to click more, they knew what they were supposed to do. By the end of the week they could tell me what each bead stood for and what type of information it wanted. I had never seen them catch on to anything so quickly.

The EET site has links to videos that demonstrate how it is used as well as research to back up their program. You can find a lot of really good you tube videos as well. You can click here to check out their site. I reviewed some of these before I taught my kids the strategy. I was really amazed with how fast they caught on. We went through the beads colors and their meaning in kind of a sing-song method and they seemed to help them retain the information. They all wanted to use the ‘caterpillar’ and move the beads to describe the practice pictures we were using. They were very engaged.
Here is a sample I did with my kids after a week of using the strategy. We described PEEPS. We were doing a whole speech unit on PEEPS. We desribed PEEPS, summarized how they were made, made our own PEEP diaramas and wrote about them. This sample of a PEEP description from one of my lower language students. I did give them some support when doing the description, but it was minimal.
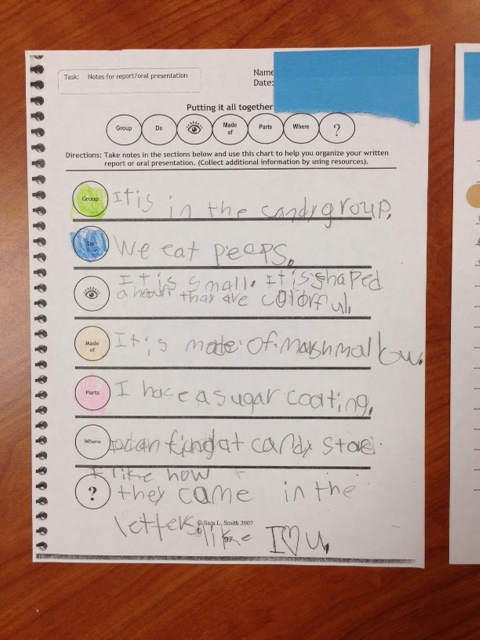
This is one of the organizers provided in the program.

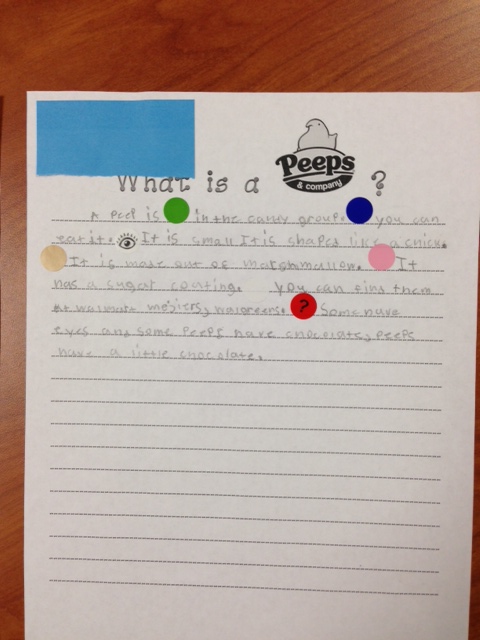
You get stickers that help students know how the write their description in paragraph form.
I have been utilizing this program in my room over the past year and I have seen so much growth in my students. So if you need something to help your students with planning their expressive langauge this is something I highly recommend. It is a concrete system for students to grap, it provides you with all the materials you will need, and it is engaging for the students. Talk about a triple threat!
* For those SLPs living in the Land of Lincoln ( that’s Illinois for the rest of you folks ), the creator of the EET, Sara Smith with be speaking at ISHA! ISHA is February 7-9.
* Speech Room New’s own Jenna Rayburn with also be presenting at ISHA this year!


4 Responses
Thank you so much for your description of this product. I myself have been conducting research and trying to decide whether to purchase this product or not. Did you complete the training course as well, or did you just purchase the kit?
I purchased the kit after doing lots of research. I read the manual which covers the program very well, so I felt very confident using it with my students. I was able to attend Sara Smith’s presentation at ISHA this year. She discussed what was mainly in the manual although she did state that as you teach the system to your students, to always teach all the beads during a session and not fixate to much on one. If a student is having a difficult time with one concept, take the time to address it but make sure the whole system is taught.
Love this program!! MIght have to try a DIY version until I can convince someone to buy this for me.
You could always put a project in donors choose and see who can fund it.